Hardware & Networking for a Computing Cluster
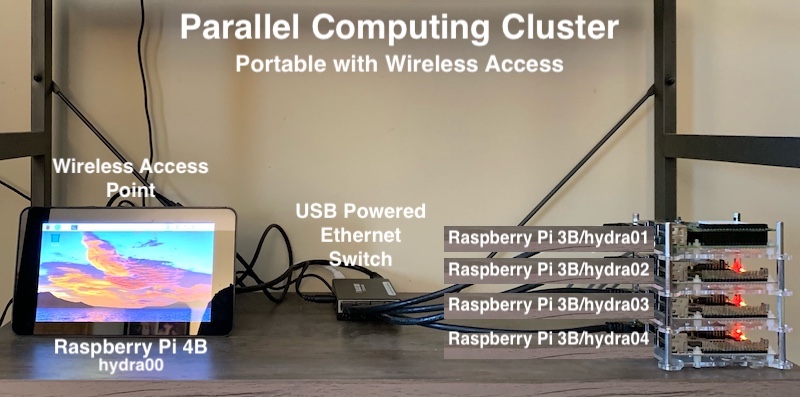
The Parallel Computing Cluster example documented here creates a computing cluster with one Raspberry Pi 3B "master" node, and three (3) Raspberry Pi 3B "compute" nodes. All nodes are running the same version of the Raspberry Pi OS (Bullseye / Debian 11):
- 1x Raspberry Pi (Model 3B) as the Master
- 3x Raspberry Pi (Model 3B) as Compute
- Raspberry Pi OS 11 (Bullseye) Operating System
Although any similar processor boards can be used (Raspberry Pis, Orange Pis, Banana Pis, Le Potatoes, etc.) for each, these were what was avilable at the time of this project. What matters more is running the same / similar operating systems, rather than the specific choice of processor boards. Also, using processors of "about" the same performance is useful in synchronizing tasks across computers, otherwise -- if not careful -- it is possible to have some computers sitting idle waiting for others to complete.
The primary goal of this project is to test and demonstrate the computing model of taking a single computing task and dividing it across multiple computers (network nodes), and running them in parallel using open source software. This computing model easily scales to a larger number of computers and/or faster processors.
Static Ethernet Networking
When distributing processing across multiple computers, those computers should have a static (consistent) network address and name, so that they can esaily communicte with each other. By convention herein (although any consistent convention will work), the nodes are named hydra0x (i.e., hydra01 -> hydra04), e.g. (for node 1):
$ sudo vi /etc/hostname

hydra01
and the static network addresses are 192.168.4.11x, e.g.:
$ sudo vi /etc/dhcpcd.conf and add (for node 1):

interface eth0
static ip_address=192.168.4.111/24
static routers=192.168.4.110
static domain_name_servers=192.168.4.110
where 'x' is replaced the network node number, from 1 to 4.
Computing Cluster Portability (WAP & Ethernet Bridge)
Another one of the project goals was mobility and portabilty, such that the "cluster" could be easily packed away, moved, and set up anywhere. Therefore, network connections are provided by a small USB powered BlackBox Fast Ethernet Switch, which in this example creates a separate independent subnet of 192.168.4.0/24.
Adding a Wireless Access Point, so that a nearby traditional computer (with a keyboard and display) can connect to this computing cluster, is documented here: How To - Wireless Access Point
Sharing Files via NFS
For parallel tasks to work on the same data, or sets of related data, it is useful to have a shared filesystem. Although either Samba or NFS could be used for file sharing, in a Unix/Linux-only environment, NFS tends to be more capable (whereas in a mixed-enviroment with Windows computers, Samba makes more sense). Since this example includes only Linux-based computers, these instructions will cover NFS.
On the first (01) Master node, set up an NFS server:
1. Install the NFS Software
$ sudo apt-get update
$ sudo apt-get upgrade
$ sudo apt-get install nfs-common nfs-kernel-server
2. Mount a Flash Drive (optional, only if you want to share files on a flash drive)
Note: After inserting a new USB flash drive into the 01 node, run the command:
$ dmesg | grep "removable disk"
to confirm the device name, and if not [sda], substitute that device name in the commands below.
Of course any existing files on the flash drive will be permanently erased!
Also, these commands assume that the flash drive has already been partitioned (usually out of the box with a single FAT filesystem). If the flash drive is not already partitioned, you will need to use a utility like parted to first partion the flash drive.
$ sudo umount /dev/sda1 (in case it was auto-mounted)
$ sudo mkfs -t ext4 /dev/sda1
$ sudo mkdir /data
$ sudo vi /etc/fstab and add:

/dev/sda1 /data ext4 defaults 0 0

$ sudo mount -a
3. Export the /data directory to Compute nodes
$ sudo vi /etc/exports and add

/data  192.168.4.112(rw,sync,no_root_squash,no_all_squash,no_subtree_check)
/data  192.168.4.113(rw,sync,no_root_squash,no_all_squash,no_subtree_check)
/data  192.168.4.114(rw,sync,no_root_squash,no_all_squash,no_subtree_check)

$ sudo exportfs -a
On each of the remaining (02 -> 04) Compute nodes, install an NFS client:
1. Install the NFS Software
$ sudo apt-get update
$ sudo apt-get upgrade
$ sudo apt-get install nfs-common
2. Verify the Exports from the Master (01) (don't continue until you can see these)
$ showmount -e 192.168.4.111
Export list for 192.168.4.111:
/data 192.168.4.114,192.168.4.113,192.168.4.112
3. Create a Mount Point for /data & Mount the NFS Share
$ sudo mkdir -p /data
$ sudo vi /etc/fstab and add

192.168.4.111:/data  /data  nfs  auto,_netdev,x-systemd.automount  0  0

$ sudo mount -a
Installing a Job Scheduler
Now that you have a cluster of single board computer on the same network and with shared storge, the next step -- Part 3: Install a Job Scheduler -- will cover open source software that allocates cluster resources, and manages the process of running jobs across the cluster.